


In our previous blog posts on CUI, we've covered the various locations that are supported by CUI and how you can use CUI to add or modify the functionality of buttons and menus. While the existing CUI offerings make this kind of customization easy, a powerful new tool has been added to the CUI toolkit in Aras Innovator 12.0 SP18: CUI Commnds. Commands streamline the process of modifying the existing functionality of Aras Innovator to make it even easier to solve your business needs. In this blog post, we'll cover the basics of implementing CUI Commands and walk through a sample use case of opening a classificaiton dialog when one of our users creates a new item.
What CUI Commands Are
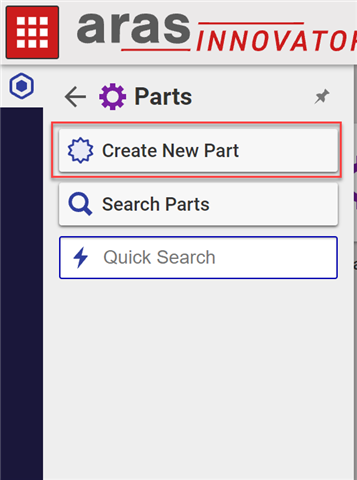
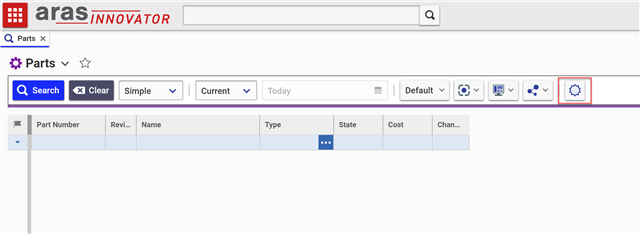
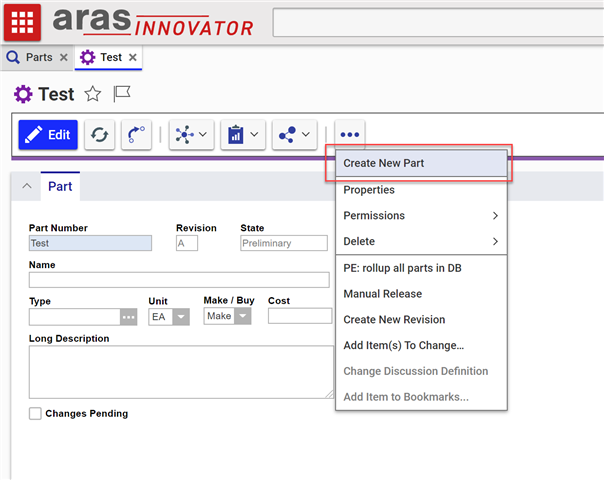
In the standard user interface, common actions like creating or saving an item can be triggered with multiple different buttons and menus. For instance, creating a new item can be triggered three different ways.
- Using a menu button from the TOC
- Using a button from the main search grid
- Using a menu button in the item window
Previously, if we wanted to change the client-side functionality when a user puts an item into the edit state, we would need to find and modify each of these CUI items individually. Due to the changing arguments depending on the location of a CUI item, we may also need to create three separate Methods for each of those CUI items as well. However, with CUI Commands, there's a simpler way. Now, we can simply create a single CUI Command with a single Method to easily modify the functionality of all of these CUI items.
The Use Case
Something we've seeen implmeneted a few different times in the past is the ability to prompt an end user to pick a classification when creating a new item. In this way, they will then be taken directly to any classification-specific Form after choosing a classifcation for their new item. In previous iterations, this was handled using a Client Event, but we're going to cover a different approach using CUI Commands today.
Configuring The CUI Command
By following the steps below, we can create the CUI Command item that we will need to configure on each of our ItemTypes.
- Login as admin
- Navigate to TOC > Administration > Methods
- Create a new Method named labs_newitemwithclass_execute and with the sample code below
const itemType = options.itemType;

// Open up a classification dialog
var param = {
    aras: aras,
    isEditMode: true,
    itemTypeName: itemType.name,
    class_structure: itemType.class_structure,
    dialogType: 'classification',
    selectLeafOnly: true,
    isRootClassSelectForbidden: true,
    resizable: true,
    content: 'ClassStructureDialog.html'
};

ArasModules.MaximazableDialog.show('iframe', param).promise.then(function(value) {
    value = value || "";

    // Create a new Item
    let node = aras.newItem(itemType.name);
    if (node) {
        // Set the chosen classification
        aras.setItemProperty(node, "classification", value);
        aras.itemsCache.addItem(node);
        // Then open a window to display that new item
        aras.uiShowItemEx(node, 'new');
    }
});
- Navigate to TOC > Administration > Configuration > Commands
- Find the base NewItem Command and open that to serve as an example
- Create a new Command item
- Name this NewItemWithClassification
- Set the Can Execute property to the same as the base NewItem Command: cui_new_item_can_execute
- Set the Execute property to the new method we created in Step 3
- Save the Command Item
Configuring Our ItemTypes
Now that we have the reusable CUI Command created, all we need to do is configure which ItemTypes we want to use this on. For our example, we will use the Part ItemType, but the steps will be the same for any ItemType with a classification.
- Login as admin
- Navigate to TOC > Administration > ItemType
- Search for and open Part
- Navigate to the Client Style relationship tab
- Open the related Presentation Configuration
- Navigate to the Presenation Command relationship tab
- Add a new related item here
- In the search grid that pops up, search for and select the NewItemWithClassification Command that we created above
- Set the Command Alias to NewItem
- Save the Presentation Configuration
Once we have this change saved, we can open up a new Part search grid and test out our changes by trying to add a new Part. Because of the nature of CUI Commands, it shouldn't matter what button or action you use to create the new Part.
Limitations of CUI Commands
CUI Commands are very powerful and simple to use, but they currently can only be used with existing standard actions like creating a new item, saving an item, deleting an item, etc. If you have any custom CUI items that are reponsible for performing these actions, you will also need to navigate once to each of those CUI items and set the appropriate Command Alias on each of those. You won't need to do this for the standard CUI items as those have already been configured with the appropriate alias.
Conclusion
These new CUI Commands offer even more flexibility to the existing suite of CUI tools. If you already feel comfortable using CUI in your system, think of some ways that you can integrate CUI Commands into your environment as well. Feel free to share your use cases for CUI Commands below.