


The Aras Testing Automation Framework (TAF) is a framework to facilitate- you guessed it- the automatic testing of your Aras Innovator instance, available to our TAF subscribers. TAF templates are designed to work with Microsoft Visual Studio, so you’ll need that installed. The best usage of automated testing is to make sure that your applications and instance continues to perform as you expect it to, even as you alter it or make upgrades. It can be a tremendous savings in terms of time and effort to maintain your system.
It is not, however, for those uncomfortable with technology.
TAF is comprised of two core pieces. The Web UI client tests are built from Selenium, a widely used tool for automating interacting with essentially anything in a web page. The Server Integration Tests instead make heavy use of AML, as well as NUnit TestRunner, to check the state of your system. Both can be made part of your regular automated testing, or even part of continuous integration builds. Together, those two pieces allow coverage of the vast and sometimes messy permutations and customizations that you might need for Aras Innovator.
Installation
There are two parts to setting TAF up for use. First, you’ll need to activate the product. Second, you’ll need to install the templates to your Visual Studio application. These templates are for making new Visual Studio projects complete with all the tools you need to build your tests.
Lets handle the activation first.
- Log in to your innovator instance as an administrator.
- Click on the user icon at the top right.
- From the menu that opens, click Activate Feature.
- Enter your license, then click Activate Feature.
Easy as can be. We need to do this because order to execute automated tests using the Aras Test Automation Framework, the target Aras Innovator instance must have a valid feature license that includes the Aras.TestAutomationFramework feature. The next part is going to be straightforward as well, and then we’ll get into some of the more complex details of how to use TAF.
In the Aras Test Automation Framework CD Image, there’s a templates folder. Take a look inside that, then follow the steps below.
- Double click Aras.Taf.Templates.Installer.vsix to start the installation process.
- Choose the version of Visual Studio you’d like to use TAF with.
- Click install.
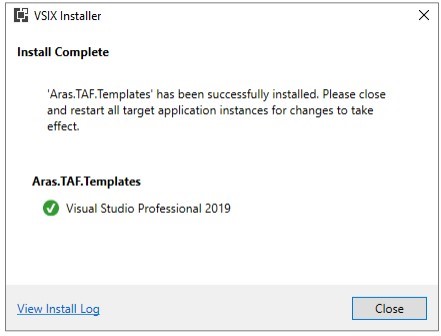
- Once the installation is complete, you’ll see a message saying so.
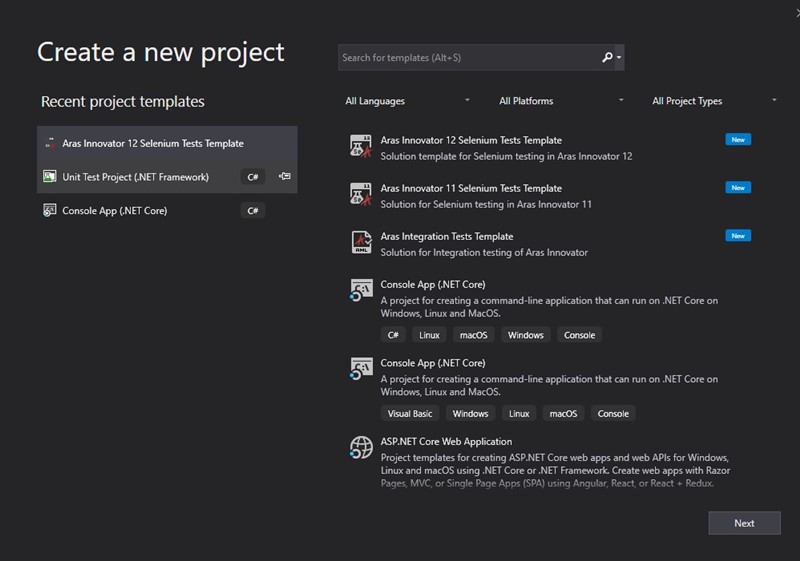
To actually use TAF, we aren’t going to start in Aras Innovator. Instead, we’re going to open up Visual Studio and make a new project.
UI Tests
Create a new project from the file menu, and look for the new project template called Aras Innovator 12 Selenium Tests Template. Give it a name. If you’re a developer, you should feel comfortable with the layout that results. We need to make some quick configuration adjustments before we get started writing anything new.
- Open the App.Config file and point to your instance.
- Look for the InnovatorApp tag. You want the ClientUrl and ServerUrl properties to that of your instance. Alter the Database property to be your database. Likewise, you want the Version and Buildnumber to reflect what instance you’re using.
- Beneath, in the Chrome tag, make sure the PathToUserProfile is mapped correctly. It most likely is in the form “c:/Users/[YOUR USERNAME]/AppData/Local/Google/Chrome/User Data/”
- Lastly, make sure that the SeleniumGrid is configured correctly. The MachineAlias will need to reflect the machine you’re running on, such as “a-win10-selenium”
- Open the TestCredentials.json file and update your permissions.
- You should see three users in the default TestCredentials.json file. You can have any positive non-zero number of users in here, but make sure that they’ll work on your instance.
- To confirm you’ve done the first two steps correctly, open the Tests/CoreSmoke folder and check that an example test works.
- Right click the LoginProcedure.cs
- Click Run Tests.
- Wait, and watch. You should see a message saying that the test ran successfully.
Alright, lets do something new. Add a new test under the Tests folder- just right click, add new item, and add a C# class- then replace your starting test with the following code.

Hopefully you’ll find the comments spell out what we’re doing as we do it. In short, this test opens a part called MP0101, returning success as long as that part exists and opens successfully, then logs itself out. Yay, we can now do something you could do in four mouse clicks, only now we can do it with code.
Conclusions and Congratulations
This is just a broad overview of the purpose and capability of the Aras Testing Automation Framework. You’ve installed and configured TAF, as well as built a basic test for your instance. You’ve taken your first steps into automating your testing workflow so that you can upgrade and tinker with your instance while being confident you’ll know about it when something goes wrong. (Database backups not included, and always recommended before making significant system changes. Remember developers, don’t program in production!) While there’s a lot of syntax and detail yet to be explored, we’ve got documentation to go along with the templates, and as always we invite questions here or on the forums!