


Admins, developers, and IT professionals may want to take these steps to install and test the latest Aras Innovator server pack alongside the current development installation, and/or to create a sandbox for development and testing activities. This guide will pick up where my last post ended, and walk you through the steps required to install Aras Innovator on a local machine for testing and development purposes.
Please note that this blog post is intended as a quick guide to help Aras Innovator admins, developers, and IT professionals set up a machine or VM as a development server. These instructions are not suited to installing a production instance. For all production installations, please refer to the Aras Innovator documentation and recommendations by Aras Support.
Prerequisites
You'll need to satisfy the following prerequisites before beginning to install Aras Innovator.
Administrator Permissions
Installing Innovator requires that the logged-in Windows user has administrative permissions on the machine. If you don't have admin permissions on the machine you're installing Innovator to, check with your IT organization or the manager of the system. Without the correct permissions, you'll be unable to correctly install the system requirements that Innovator needs.
System Requirements
If you've never installed Aras Innovator on this machine before, you'll need to install and configure a few required components like IIS (Microsoft's webserver), SQL Server, and .NET Core. You can follow this guide for step-by-step instructions to configure your server. Even if you have configured the server to install Innovator before, it's a good practice to check the Platform Specifications document every time you install a new version of Aras Innovator, as requirements can change. You can find the Innovator 12.0 version here.
Aras Innovator Installer
And of course, you'll need the Aras Innovator installer. If you're an Aras subscriber, you can access the latest (or any) service pack on the Aras FTP site. If you're an open-source user, you can download the latest open release here. In either case, the installer file will be named InnovatorSetup.msi.
Installation Steps
Getting Started
- Run InnovatorSetup.msi to begin installing Aras Innovator.
- Read and accept the license agreement.
- Click Next.
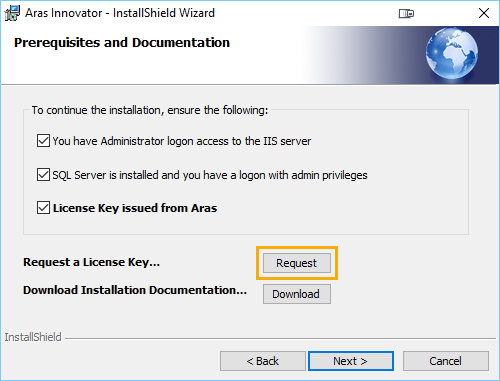
- Confirm and check off all items in the prerequisite checklist.
- If you do not have an Aras 12.0 framework license for the current machine, click Request to request a framework license from the Aras website.
- After completing the request, confirm that you have received a new framework license via the email address you provided.
- If you have any issues requesting or receiving a framework license, please email [email protected].
- Click Next.
Installation Folder
By default, the Aras Innovator installer suggests C:\Program Files(x86)\Aras\Innovator as the root installation folder. However, we typically recommend choosing a more descriptive name for the target installation folder. This practice becomes particularly helpful in the event that you have several different versions of Innovator installed on the same server.
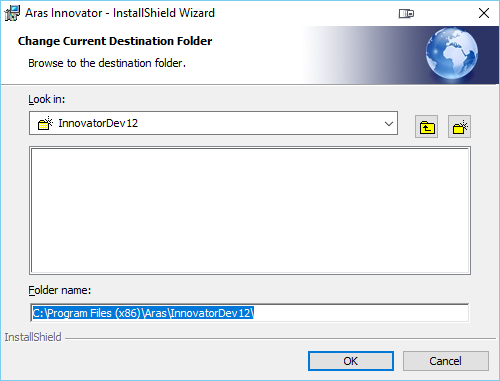
- To choose a new destination folder to use for your Innovator installation, click the Change button.
- Replace "Innovator" with your desired install folder name. In the example above, we've chosen to name our installation folder InnovatorDev12.
- Click Next.
A note about installation folder names: Stick with alphanumeric characters and underscores for your install folder names. Avoid spaces, dashes, and other special characters.
Installation Type
Here you're given a choice between installing either Complete or Custom. Complete installs every component of innovator, while custom allows you to pick and choose what will be useful for you. This guide will assume selection of the Complete option.
Choosing the custom option will bring you to the screen below. The Innovator Server, Vault Server, Database, and Oauth Server are important to install for basic functionality of Aras Innovator. The ConversionServer and Agent Service are related to things like PDF generation, or the import of CAD files.

Agent Service Settings
- If there are no other Aras instances installed on this server, click Next to accept the default port and folder.
- Otherwise, enter a unique name for the Aras Innovator Agent Service. (ex: http://localhost:8734/
ArasInnovatorAgent_12_Demo) - Click Next.
- If you opted to install Aras to the default installation directory, click Next.
- If you entered a custom install directory, replace InnovatorServer in the Application Server URL with the name of the install directory.
- For example, an instance installed in C:\Program Files (x86)\Aras\12_Demo should have an Application
Server URL of http://localhost/12_Demo/Server/InnovatorServer.aspx. - Click Next.
More Installation Settings
- Paste your framework license into the License Key field.
- Click Next.
- If you opted to install Aras to the default installation directory, click Next.
- If you entered a custom install directory, replace InnovatorServer with the name of the install directory.
- For example, an instance installed in C:\Program Files (x86)\Aras\12_Demo should have a web alias of
12_Demo.
- For example, an instance installed in C:\Program Files (x86)\Aras\12_Demo should have a web alias of
- Click Next.
- Click Next through all pages, accepting the default settings, until you reach "Configure Database".
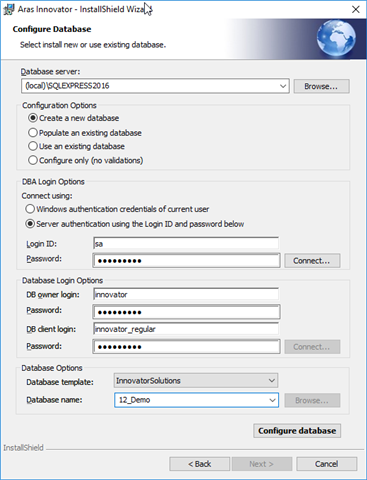
Database Configuration
- Click Browse to select the database server.
- Select the desired database server from the dialog.
- Click OK.
- Under Configuration Options:
- Select Create a new database
- Under DBA Login Options:
- Select Server authentication using the Login ID and password below
- Enter Login ID: sa
- Enter Password: password for sa (SQL Server admin user)
- Click Connect...
- Under Database Login Options:
- Enter DB owner login ID: innovator
- Enter Password:
- DB client login: innovator_regular
- Password:
- Under Database Options:
- Select Database template: InnovatorSolutions
- Database name - enter the desired database name
- Click Configure database
- Click Yes to confirm database installation and configuration
- After database installation/configuration is complete, click Next.
Finish Installation
- Click Install to begin installation of Aras Innovator.
- After installation is complete, click Finish to close the Aras Innovator setup wizard.
Other Cases and Troubleshooting
I want to install the latest Aras Innovator service pack release on my laptop, but I don't want to mess up my current development installation.
It's possible to install multiple instances of Aras Innovator on the same machine - in fact, it's a pretty common scenario for development and testing servers. You just need to make sure that you choose a unique installation path, web alias, and database name for your new Innovator instance. That way the Innovator installer will set up the instance as a new web application in its own directory.
Still nervous? You can always zip up your code tree and backup your database for peace of mind before making any server configuration changes. Learn how in this Aras Labs blog.
What if I just want to add a new Innovator database to my existing installation?
Adding a new database to your existing Aras Innovator instance is an easy way to give yourself, your teammates, or your users a sandbox for development and testing activities without installing a whole new Innovator instance. Just follow the steps under How to restore a database from a backup in this Aras Labs blog post and add a new database connection tag to your installation's InnovatorServerConfig.xml file.
- Open the InnovatorServerConfig.xml file in the folder where your Innovator instance is installed.
- Find the existing DB-Connection tag, then copy and paste it onto a new line.
- Replace the id and database attributes of the new tag with the name of your new database.
<DB-Connection id="InnovatorTest12" database="InnovatorTest12" server="(local)\SQLEXPRESS" regular_uid="innovator_regular" regular_pwd="innovator" dbo_uid="innovator" dbo_pwd="innovator"/>- If your new database is on a different SQL Server instance than the database in the tag you copied, update the server attribute and password attributes as needed.
- Save your changes to InnovatorServerConfig and refresh your Innovator login page to see the new database option in the dropdown.
I get a redirect uri error when I try to login to my new Innovator instance.
This error is related to some changes in the way that authentication works in Aras Innovator 12.0. The OAuthServer keeps a list of client URLs stored in a config file. If the URL you are using to connect to Aras Innovator is not within the list, you will receive this error.
You can check this list of URLs by following the steps below.
- Navigate to your Aras Innovator installation folder
- By default this is C:\Program Files (x86)\Aras\Innovator\
- Open the file \OAuthServer\OAuth.config in a text editor
- Scroll down until you find the <redirectUris/> tag in the InnovatorClient registry
- Confirm that the URL you are using matches the first part of one of these redirect URIs
To give an example of when this error would be thrown, http://localhost/InnovatorServer is within my list of redirect URIs. When I navigate to this URL, I can see the login page as expected. However, the list of URIs does not contain something like http://127.0.0.1/InnovatorServer (127.0.0.1 is the IP address that points to your local machine). Using this IP address is technically correct as it redirects me to the login page; however, I receive the Invalid redirect_uri error because it is not in the list of URIs contained in the <redirectUris/> tag.
To resolve this issue, you can either use one of the URLs contained in the list, or you can add the URL you are using to the list.
I get a different error when I try logging into my Innovator instance.
The other most common issue is a 500 error after installing Aras Innovator. This is most likely related to a incorrect version of either .NET core or the .NET framework. Aras Innovator 12.0 has different requirements than previous versions, and without the prerequisites described above in this post, you'll most likely receive a 500 error. Take a look at the Configuring your Development Machine blog post and ensure your configuration matches the one we've laid out.
If you're still having trouble logging in, whether it be this issue or any other, try taking a look at our Community Forums! The forums are a great place to look for similar issues, or post seeking guidance. We have a small active community who are always looking to help each other out.
Looking for more Aras inspiration?
Subscribe to our blog and follow @ArasLabs on Twitter for more helpful content! You can also find our latest open-source projects and sample code on the Aras Labs GitHub page.