


The Configurable User Interface is the next step forward in low code, highly customizable processes for your organization. When you want to get something done, often the first place you go to is a menu. When you’ve added something new yourself, you want to put that in the most appropriate menu. In this article, we’re going to add a menu item, a submenu item, and then selectively disable a menu. Once you've done that, you should have a good handle on how to tweak the menus in Aras Innovator to better suit your needs.
Screenshots will be taken from Aras Innovator SP10, and the steps given assume you’re logged in with an administrator account.
Adding a Menu Item
Actions make for the most common thing one might want to add to a menu. Perhaps you have an action which as an administrator you find yourself taking often, like referring an item into a queue for later correction. Being productive, busy people, administrators don’t want to forget about a small mistake they see, but might not prioritize the correction at the moment they see it. Assuming we already have our “Fix Later” action, how do we give it a place in a menu that will always be available?
- In the Table of Contents, go to Administration -> Configuration -> Client Presentation.
- Click the Search button.

- Click the Global item property.
- In the Command Bar Section grid, open the com.aras.innovator.cui_default.mwh_header_user_menu item with the MainWindowHeader location.
- Click the Edit button.

- Click the New button in the Command Bar Item grid. In the resulting dialog, select Menu Button and click OK to create a new menu button with the following properties:
- Name: Fix_Later_Action
- Sort Order: 3100
- Action: Add
- For Identity: Administrators
- Right click the new button row and click Open.
- Give the new menu button the following properties:
- Label: Fix Later
- Parent Menu: com.aras.innovator.cui_default.mwh_user_menu
- Click Method: select a Method you want to run when the button is clicked
- Click the Save button
 and close the Menu Button tab.
 - Click the Save button in the Command Bar Section tab.
- Log out of Aras Innovator and log back in as a member of the Administrators identity.
- Click the global user menu button in the top right corner of the window and select My Admin Action to run your custom action.

Now, if you go to the global menu at the top right, you should be able to see your new menu item. Onward! And inward! Westward? One of those directions.
Add a Submenu Item
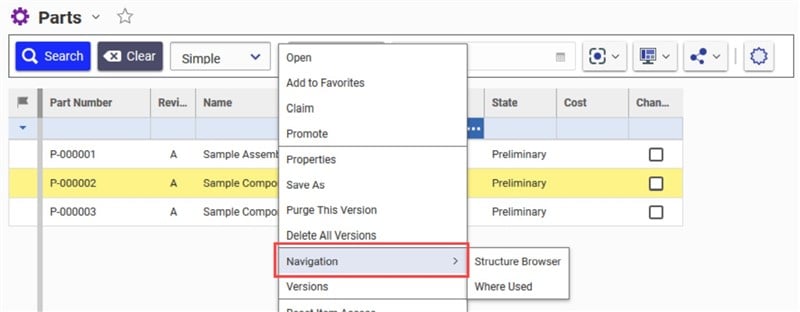
The ideal menu shows exactly the right array of options. Too few, and we don’t have the tools we need. Too many, and it becomes hard to find the option we want. Fortunately, in the Configurable User Interface we can nest menu options underneath each other, giving us all the tools with none of the clutter. As an example, lets store the Structure Browser and Where Used menu items under a new Navigation section in the main grid context menu. (That is, the menu you see when you right click a part from a search.)
- In the Table of Contents, go to Administration -> Configuration -> Client Presentation.
- Click the Search button.
- Click the Global item propert.
- In the Command Bar Section grid, open the com.aras.innovator.cui_default.popup_menu_for_item_grid item.
- Click the Edit button.
- Click the New button in the Command Bar Item grid. In the dialog, select Menu and then click OK to create a new menu button with the following properties:
- Name: My_Nav_Menu
- Init Method: initPopupItemInItemsGrid
- Sort Order: 1300
- Action: Add
- For Identity: World
- Right click the new button row and then click Open.
- Set the following properties in the menu:
- Label: Navigation
- Click on the save button and then close the new Menu tab.
- To move the the Structure Browser action to the new submenu, use the following steps:
- On the Command Bar Section form, open the com.aras.innovator.cui_default.pmig_Structure Browser Menu from the Command Bar Item grid.
- Click the Edit button.
- Set the Parent Menu property to “My_Nav_Menu”
- Save and close the Structure Browser Menu item tab.
- Move the Where Used action to the new submenu:
- On the Command Bar Section form, open the com.aras.innovator.cui_default.pmig_Where Used Menu from the Command Bar Item grid.
- Click the Edit button.
- Set the Parent Menu property to My_Nav_Menu.
- Save and close the Where Used Menu item tab.
- Click the Save button for the Command Bar Section.
To see your results, open up Parts (or any search grid) and run a basic search, then right click a row. You should see the “Navigation” submenu, and within, the familiar Structure Browser and Where Used options!
Disable a Menu
Last trick for now: Sometimes, you decide you really don’t want users making use of a certain menu for some reason. It could be that you want to link access to that menu to certain permissions, or to particular steps in the process. In our example, we’re going to disable the Share menu for items that haven’t been released yet.
- In the Table of Contents, go to Administration -> Configuration -> Client Presentation.
- Click the Search button
- Click the Global item property.
- In the Command Bar Section grid, open the itemview.itemcommandbar.default item.
- In the Command Bar Item grid, open the itemview.itemcommandbar.default.share item.
- Click the Edit button.
- Replace the normal Init Method with a custom Method that contains the following code:

- Click Save, then close the Menu item.
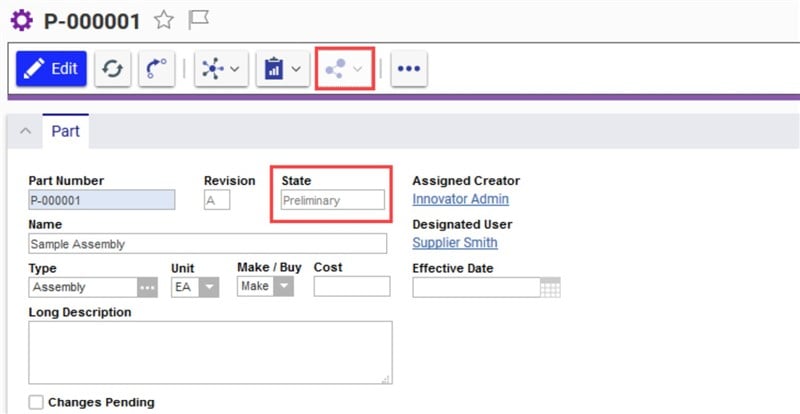
To see this in action, go to an unreleased item. You should see the Share button is present, but grayed out and disabled.
Conclusions and Congratulations
We created a menu item and a submenu item, allowing for quick access to the tools you need, where you need them. We also disabled a menu, to better control the process for your organization. We hope this has been a useful insight into the Configurable User Interface, and we’re curious what additions you find most helpful to your menus- let us know in the comments below what you’d want.