

What is a Life Cycle?
A life cycle is a map of the possible states an item can be in and the ways it can transition between them. Here in Aras, that is a State and a Transition, respectively. A life cycle map can be as simple as switching between Inactive and Active (and back again), or even more complex than the Engineering Change Request (ECR) life cycle pictured below:
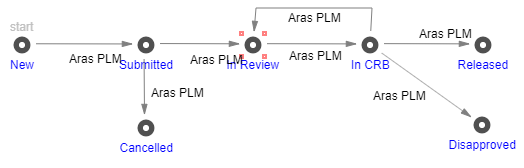
Aras Standard ECR Life Cycle
States
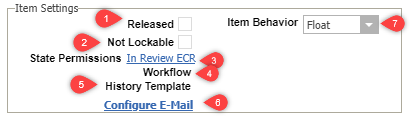
Item State Settings
A life cycle will need a start state, although it does not require an end or released state. Opening a new life cycle map will set the start state to the existing default state. To move the start state flag, right-click on the state you wish to flag and select “Set as Start State” from the menu. Beyond that requirement the following settings are available at the state level:
- Released
- When an item is “Released,” the item will no longer be editable unless it is bumped to a new version. This will also reset the life cycle.
- Example: An item could be "released" when a change request is completed on the item, resetting the life cycle for the next generation of the item.
- Not Lockable
- States in Aras can also be set to “not lockable” so that no edits can be made while in that state, however this is different from released as the item is not versioned for this lockout.
- For example, if set for an “In Review” state on a Part item, it would not allow edits in the traditional sense, requiring users to make changes via the change management system.
- State-level Permissions
- Setting a permission at the state level will override the default permissions set on the item.
- In the above example with the CM lockout, a state-level permission could be applied to only let members of the change management group edit the item in question.
- Workflow
- A state can be set to start a workflow, as opposed to the workflow starting automatically at item creation.
- The setting could be used to start the item's workflow after it is manually promoted out of an idea holding state and into active engineering.
- History Template
- An item’s history template can also be overridden here. Note: the original item must have a template set for this to occur.
- Email
- A state can be set to send an email, similar to other places in the system; however the syntax is somewhat different as noted in the referenced blog post.
- Item Behavior
- The Item Behavior setting is special. This toggle controls item versioning, if it has been set on the ItemType. It will also need to be set on the relationship, in addition to on the life cycle. There are 4 possible settings:
- Fixed- The source item (in the current state) points to a specified generation of the related item.
- Float- The source item (in the current state) points to the latest generation of the related item.
- Hard Fixed- The behavior is Fixed, as described above, and cannot be changed by any subsequent states in this life cycle.
- Hard Float - The behavior is Float, as described above, and cannot be changed by any subsequent states in this life cycle.
- The Item Behavior setting is special. This toggle controls item versioning, if it has been set on the ItemType. It will also need to be set on the relationship, in addition to on the life cycle. There are 4 possible settings:
Transitions
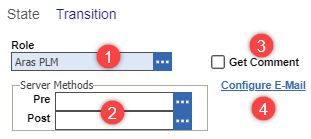
Transition Settings
Regarding transitions, these are used to show the available paths an item can take and set the roles that can promote them. The following options are available:
- Role
- Set the role allowed to perform promotions. The role will be shown as the transition “name” on the map.
- The Aras PLM role is a special identity that is used when a life cycle is completely automated and tied to a workflow. Items cannot be promoted manually using this role and any state promotions must happen via the workflow.
- Server Methods (Pre/Post)
- You can use transitions to activate server methods (pre- or post-transition).
- Server methods can be used on transitions for validation purposes, not allowing the item to be promoted until required information is in place.
- Get Comment
- Present an option for the user to comment on the promotion. These comments can be found in the item history report by going to Navigate (or View v11) > History on the item. (This report is only available if item history is set to at least default on the item.)
- Email
- Once again, emails can be sent from a transition as well as a state. Email will be sent on entering the next state.
Applying a Life Cycle
One more thing to cover: how do you add your life cycles to your item? It only takes a few steps:
- Open your ItemType and select the Life Cycles tab.
- Select (or pick) your existing life cycle map.
- Save the ItemType.
The first life cycle listed without a classification is automatically the default. But what if you are using item classification? Well you can add a life cycle for each classification,using the previous three steps, just choose the classification after you have added the life cycle and that will override the default.
Conclusion
So, with what a life cycle is explained, how should you use it? In general practice, the life cycle of an item, or item sub-class, should cover all possible states the item could be in, from New Idea to Obsolescence. Any outliers like where an item can be cancelled or placed on hold should be covered as well. Furthermore, when designing a life cycle every effort should be made to get feedback from those who will be using the system.
Have more questions? Comment on the blog below or reach out on the forums.