Domain Access Control is one of the newest ways to control access within Aras Innovator. DAC Policies give Administrators the ability to create relationship-based access controls. This kind of control is very useful when it comes to defining access to projects and work-spaces. DAC Policies work in conjunction with our other access control policies, meaning that you'll need to find the proper way to utilize all three. This blog post will go over a single example of a DAC Policy, and all the steps required to enable it within your own environment.
The Components of a DAC Policy
- DAC Domains are collections of Innovator items and users. Users are granted access to the items contained in the domain based on their roles.
- DAC Definitions govern one or more DAC Domains, and define the set of DAC subdomains, DAC Roles, and DAC Subdomain policies.
- DAC Subdomains contain the Domain item categories. In certain cases, a set of DAC subdomains can be a subset of ItemTypes defined in an Innovator instance.
- DAC Roles are the roles assigned to Domain users.
- DAC Subdomain Policies are a set of rules used to determine the access control for the items contained in a subdomain for each state of a DAC Subdomain item LifeCycle.
Preparing for the Policy
DAC Policies utilize many different parts of Innovator to function properly, namely Query Definitions. If you're unfamiliar with using Query Definitions, I'd recommend taking a look at this blog post. The Query Definition is required to create a Derived Relationship Family, which powers DAC Policies.
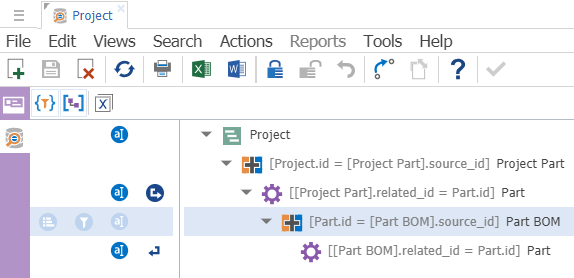
The Query Definition below will select all of the parts related to a project plan, including parts related through the BOM.
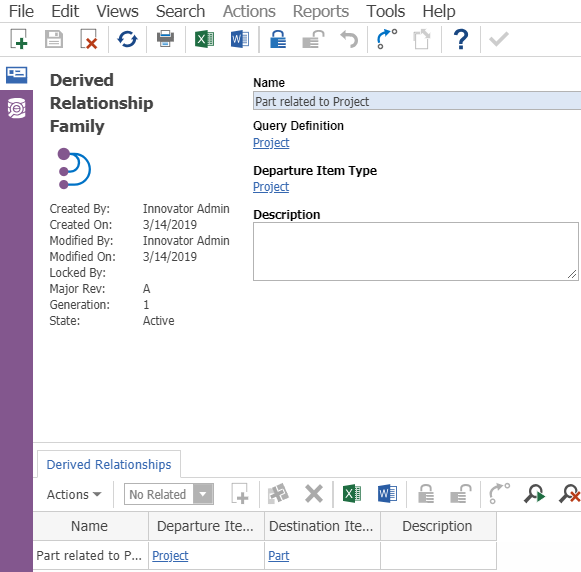
A Derived Relationship (DR) Family describes the derived relationships between Innovator items. Each Derived Relationship in a DR Family has its own destination ItemType and name. An individual DR is referred to as a DR Family Element. All DR Family elements share the same departure ItemType as determined by the Query Definition.
The DR Family Definition maps DR Family elements and non-root Query Items contained in the Query Definition, which are in turn used to create DAC Subdomain Policies. Below is an example of a DR Family which utilizes the Query Definition above.
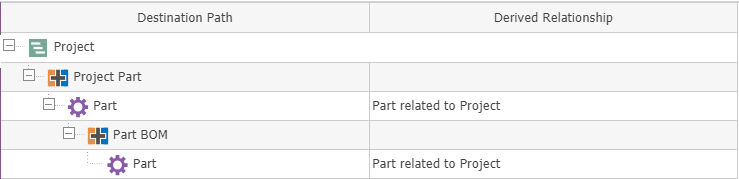
You can add a Derived Relationship to the item, and set the Destination Item to Part. Once you've configured your DR Family like the one above, navigate to the editor on the left. Here you will see a consolidated view of your Query Definition you defined earlier. You'll want to set your newly created Derived Relationship on each Part item within the Query Definition. It should look like the screenshot below.
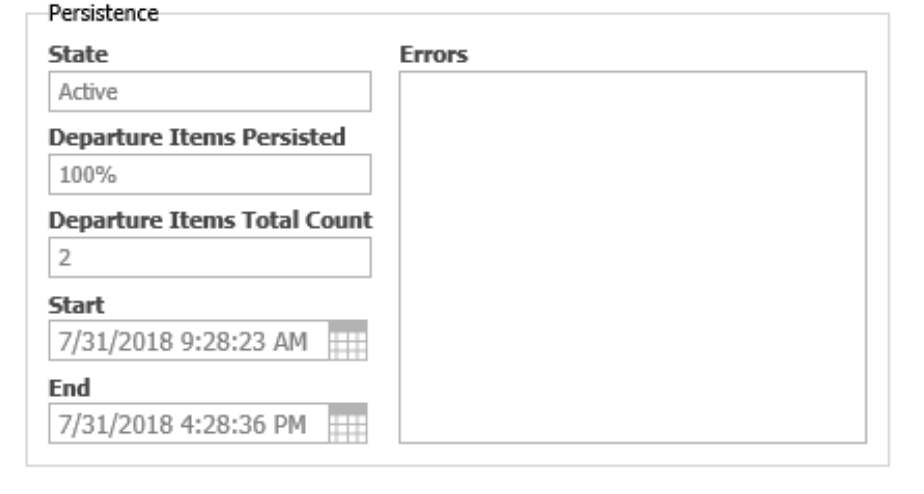
Once you create a Derived Relationship Family, it needs to be persisted across all the designated relationships and items, a process which may take quite a bit of time in large databases. unidr_Relationship items are created for all the system data which satisfies the mapping of Derived Relationships to the Query Definition. This can be achieved by promoting the DR Family to the Persist state. It is worth noting that this operation is handled by the conversion server, and will not work if your conversion server is not configured properly. It is best to perform this operation without active users, as changes to relevant data could cause issues with the persisting process.
Once the conversion tasks are complete the DR Family is automatically promoted to Active, and will no longer be editable. You can only deactivate a DR Family if it is not in active use. To deactivate a DR Family click on the promote button, and select the Preliminary state. Once the persisting process is finished, the persistence box on the right side of the form should look like the screenshot below.
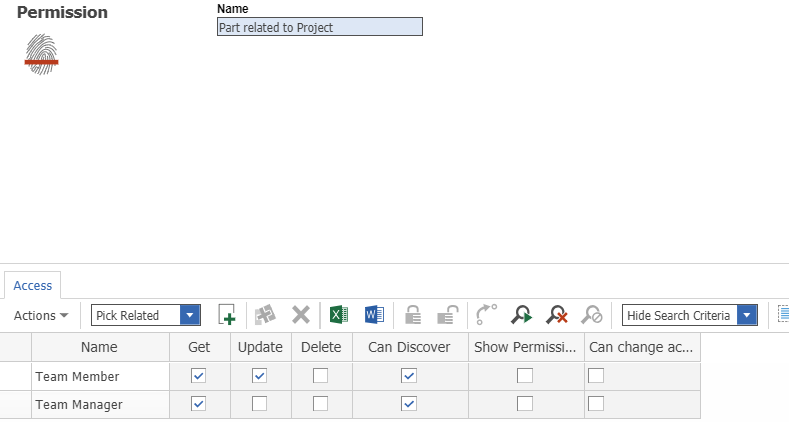
The final step before we configure our Policy is configuring permissions for our DAC Subdomain. We'll be creating a permission which grants different rights to different roles within a team. It can be configured like the screenshot below.
Defining the Policy
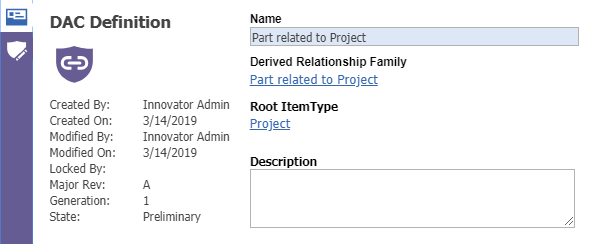
To create a DAC Policy you can navigate to Administration > Access Control > DAC Definition. On the main form, we can set then name, root ItemType, and DR Family. It should look like the picture below.
Using the definition editor, which can be accessed using the ribbon on the left, we'll be setting the proper permissions for our policy. We'll set the Subdomain Permission to our recently created permission, and set the Root Permission to the default Project permission. In this example, the Destination Life Cycle State is left empty to grant subdomain permissions to parts that have any Life Cycle state. If the Subdomain Policy should apply to a part in a specific Life Cycle State, click on the ellipses in the Destination Life Cycle State cell and select a Life Cycle State.
Once we've configured it to our liking we can activate the Policy. This can be accomplished by promoting the DAC Definition item to an active state. If your DR Family isn't configured properly you will not be able to promote your DAC Definition.
Conclusion
Now that your DAC Definition is configured and active, it should be in effect within your system. Now when you create projects associated with teams, the parts attached to that project will have your newly defined permission.
The process to configure a DAC Policy is quite long, but they allow you to control access in a way that our other methods lack. The ability to configure access based on projects or work-spaces allows you to have completely different permissions based on the type of project involved. We recently published a community project which has examples of different types of Access Control, including the example we went over in this blog. If you have any good examples of access control in action please consider contributing to our repository of examples.