

This blog is the first in a new series called From The Minvera Vault. These blogs will take some useful how to blogs from the minerva blog and updating and reposting here for ease of access.
It is relatively easy to customize your Aras Innovator environment. You can insert your company logo, a personal picture, or your favorite favicon. In this written tutorial, I will show you how to change skin, logo, and favicon in Aras Innovator.
How to do it on Aras Innovator Version 11
All customization happens in the InnovatorServerConfig.xml
<UI-Tailoring login_splash="../images/aras-innovator.svg" branding_img="../images/aras-innovator.svg" product_name="Aras Innovator" banner_url="../scripts/banner.aspx" banner_height="50"/>
How to do it on Aras Innovator Version 12
In V12, graphical customization is slightly more complicated.
The login screen is actually handled by OAuth and not Innovator, and once logged into Aras, the look and feel are mostly located in CUI.
Reminder: As the Aras Upgrade is free for subscribers, please do not override Aras images during an upgrade as you could lose your changes.
Create your own logos and icons for Aras Innovator
If you already have your icons, login picture, and banner ready, you can skip this chapter.
We will use free tools to create the favicon and then the banner.
- Free SVG Tool: InkScape
- Free SVG to Icon Converter: imagemagick.org
Free tools installation
InkScape: Simply press next.
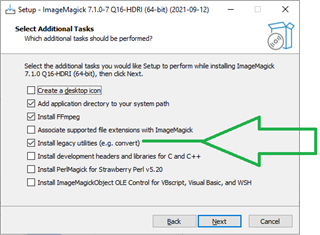
ImageMagic: For the installation, the only trick is to tick a box to deploy the utilities that we will use
You can also watch the video tutorial here ⇓

Create a favicon:
Start InkScape and open an existing SVG from Aras (best to get the right size and properties).
For the example, I started from C:\Program Files (x86)\Aras\aras.12sp18_12_DEV\Innovator\Client\images\3DViewerOff.svg
Select all content and remove it.
Design an icon of your choice or find your company logo as SVG and copy-paste it to make it fit.
Save your design in the location of your choice.
Now we need to convert our SVG to an ICO, which is a very specific type of Image. For that purpose, we use the CONVERT utility from ImageMagic
Start a CMD (WINDOWS KEY+ R) and then enter: cmd and press "OK"
Into the command prompt, enter this command where you will modify the path of your convert.exe (you might have a different version of ImageMagic) SVG and the destination of your ICO
"C:\Program Files\ImageMagick-7.1.0-Q16-HDRI\convert.exe" -background none "C:\temp\MySuperIcon.svg" -define icon:auto-resize "C:\temp\favicon.ico"
Then copy the favicon.ico and replace it into 2 folders:
- \OAuthServer\wwwroot\images\favicon.ico
- \Innovator\Client\images\favicon.ico
Create a login splash:
- Open InkSpace, and open the existing SVG used for the splash, you will then inherit all the right sizes and properties.
- .\OAuthServer\wwwroot\images\arasInnovator.svg
- Save As the svg with the name of your choice, and empty the content
- You can design your own splash content or open your company logo in svg format and copy the content to yours
- Save your svg once the design is done
Create an Innovator banner:
- Open InkSpace, and open the existing SVG used for the splash, you will then inherit all the right sizes and properties.
- .\Innovator\Client\images\aras-innovator.svg
- Save As the svg with the name of your choice, and empty the content
- You can design your own splash content or open your company logo in svg format and copy the content to yours
- Save your svg once the design is done
Login screen:
To change the login screen, you need to manually edit a configuration file.
.\OAuthServer\OAuthServer.config
Around lines 20 (content of this file can differs between version) update the path to your splash and background picture.
<add key="ProductName" value="Aras Innovator"></add>
<add key="LocalAuthenticationDisplayName" value="Aras Innovator"></add>
<add key="LogoUrl" value="~/images/arasInnovator.svg"></add>
<add key="BackgroundImageUrl" value="~/images/loginBackground.jpg"></add>
You can also rename the title that will appear in your internet browser by changing the value of ProductName and LocalAuthenticationDisplayName.
Innovator banner logo:
- Login as admin / root
- In TOC, go in Administration / Configuration / Client Presentation
- Search without entering any criteria, only one result will appear
- Open the "Global" and then click on the "Global" link under "Presentation"
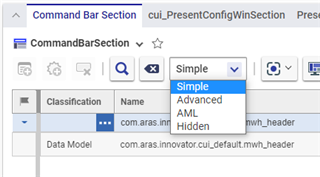
- Into the TAB Command Bar Section, change the Search from Hidden to "Simple"
- Enter the search critera in column "Name": com.aras.innovator.cui_default.mwh_header
- Search and open the only result
- Once com.aras.innovator.cui_default.mwh_header form is opened, in TAB "Command Bar Item" change the Search from Hidden to "Simple"
- Enter the search critera in column "Name": com.aras.innovator.cui_default.mwh_header_logo
- Search and open the only result
- Edit the Item and scroll down into the form to change the "Image" and select the one you prefer