

A common request I get from customers is the ability to distribute tasks with a specific process in which loops may happen, but also to have a project management view like a Gantt chart or a timeline of what's happening. This results in a debate about whether to use a Project or a Workflow for tracking these activities.
Project Benefits
- Display a Gantt chart
- Easily attach deliverables to activities
- Easily track progression of an activity
- Can edit the activities of the project during the project itself
Workflow Benefits
- Has a simple interface for users to validate activities
- Has a looping process
- Supports advanced task automation and logical relationships between tasks (a decision or another will create different set of tasks)
The best approach depends on the requirements of the process and the users. However by improving the GUI for viewing tasks, we can bring some of the Project benefits to Workflows. In this post I'll show how you can display a Gantt-like view of Workflow tasks to help users more easily track the progress of a process.
Getting Started
The code snippet shown below is part of the Workflow Timeline Aras Community Project. If you want to apply the project or view the source code in its entirety, you can find it on the Aras Labs GitHub:
ArasLabs/workflow-timeline
workflow-timeline - This project demonstrates how to implement a timeline view of an item's workflow process.
The Use Case
In a recent case, we had the following requirements:
- Use the simplicity of the workflow with the automation of activities based on path decisions
- Allow loops/iteration
- Display a Gantt-like view
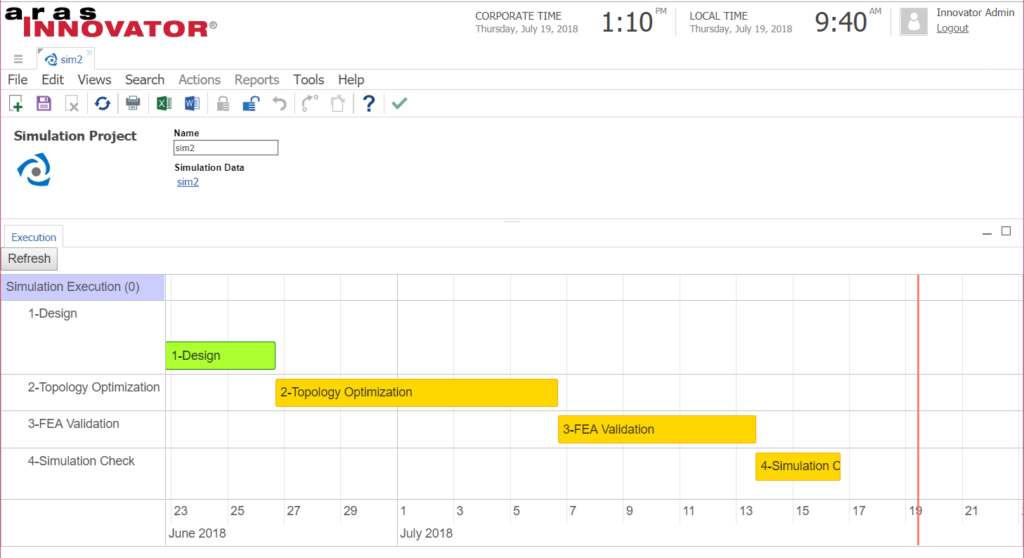
We decided to use the workflow, because it was a good fit with the main usage. Then we had to create some sort of timeline. The following screenshot shows the result:
The Code
Sorting the Activities
In this quick proof of concept, generating the timeline required us to sort the activities. A workflow doesn't really have a sorting of activities. We visually believe there is one but when processing it, but the real order may be different depending on each activity decision. So in order to show the planned activities in the right order we needed to manually define this order. That's why all activities are starting with a "X-", to help sorting.
Code Snippet
Here is the code snippet that to produces the Gantt-like timeline of the workflow.

Implementing the Code
Follow the steps below to implement a view in a relationship tab as shown in the screenshot above.
Configure the Tab
- Create a new null RelationshipType on the parent ItemType.
- Save the parent ItemType, then open and lock the RelationshipType.
- Open the Relationship View tab on the RelationshipType.
- Click the Pick Related button and select the identity that should be able to see the Gantt-like view.
- In the Form field, select the default Form that was created with your new RelationshipType.
- Save the RelationshipType, then open and lock the Form.
Configure the Form
- In the Form, add a new HTML field with the following contents.
<style>
  #visualization {
    height: 600px;
    width: 1800px;
  }
  .vis-item.active {
    background-color: #76A797;
    border-color: #5E8579;
  }
  .vis-item.pending {
    background-color: #EDC87E;
    border-color: #BDA064;
  }
</style>
<div id="visualization"> </div>
- Under the Field Label tab, delete the Label of the new field so it won't appear in the tab content.
- Remove the default item_info Field.
-
Select the Form Body tab and add the following to the CSS field.
@import "../javascript/visjs/dist/vis-timeline-graph2d.min.css"
- Select the Form Event tab and then select Create Related and click the New Relationship button to create a new Method.
- Enter a Name for your Method and select OnLoad from the Event dropdown list.
- Save the Form, then open and lock the Method.
Add the Code
- Paste the code snippet into your new Method.
- Save the Method.
- Get the required JavaScript libraries and add them to your code tree.
- Vis.js: Download the current version of Vis.js and unzip it as visjs in the Innovator/Client/javascript folder in your code tree.
- Underscore.js: Download the current version of Underscore.js and save it in the Innovator/Client/javascript folder in your code tree.
LOOKING FOR MORE ARAS INSPIRATION?
Subscribe to our blog and follow @ArasLabs on Twitter for more helpful content! You can also find our latest open-source projects and sample code on the Aras Labs GitHub page.