


In this blog post, we'll be going over the Content Modeling Framework (CMF) that was fully introduced in Aras Innovator 11.0 SP7. CMF was introduced in order to allow administrators to build a hierarchical data model that can be represented as a single, editable document for their users. The editor for these CMF documents is similar to an Excel spreadsheet, so it should be fairly easy for new users of Aras to adopt if they come from an Excel background. If you've used the Design Quality Documents or Process Quality Documents from the Aras QMS application, you'll be familiar with what a CMF document looks like.
The process of creating a CMF document has not changed much since SP7, so while the work we'll be showing today was originally done in 11.0 SP15, the same steps should hold true for any service pack in between.
Create a New CMF Document Type
Create a Container ItemType
The first step to creating our custom CMF document is to create an ItemType that will hold the hierarchical data. In this example, we'll be building a document to analyze the different risk factors that have come about during the development of a Part. To represent this data, we'll create a new ItemType called Risk Document.
Add an onFormPopulated Event
All ItemTypes that use a CMF document need a special method to be added as an onFormPopulated event to their form. You should perform the following steps on any new CMF ItemTypes you create.
- Navigate to the Views relationship tab
- Open up the related Form
- Navigate to the Form Event tab
- Add a new relationship to the Method cmf_ShowContentType
- Set this to an onFormPopulated event
- Save the Form
Create the CMF Content Type
Once we have our new ItemType, we can create our CMF Content Type by following the steps below.
- Login as admin
- Navigate to Administration > Content Modeling > Content Types
- Fill out the information for this new document type
- Name - Risk Document
- Linked Item Type - Risk Document
- Save this new document type
Define the Elements of Your Document
Now that we've created our Content Type, we need to think about what the different elements of our hierarchy should be. For our purposes, we'll want to track three pieces of information: the Parts that have risk factors associated with them, what those risks are, and what the plan for addressing those risks will be. Each Part could have multiple risks associated with it and each risk could have multiple plans to address them. CMF is ideal for this kind of data structure, and we can create this hierarchy in the Content Type editor in a few simple steps.
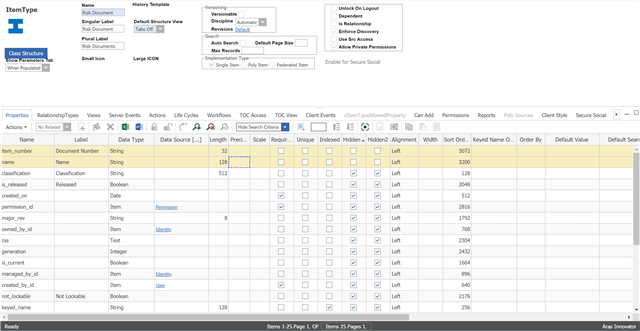
Define Properties
Once we have our hierarchy defined, we can think about what kind of data we'll need on each of our Element Types. If you've created a new ItemType before, this will be a familiar process. We can create a new Property Type from the same right-click context menu we used to define our hierarchy. Let's now define the different properties that will exist for each of our Element Types. Defining Property Types is a more streamlined process than defining standard Aras Properties. There's only a handful of properties that we need to define for each one.
- Data Type
- String, Integer, Text, Date Time, etc.
- Name
- Data Length
- This is only used for String properties
- Default Permissions (Optional)
- Computed Method (Optional)
- We'll cover this in more detail later in the blog
The properties for our hierarchy will look something like below. Note that I've added the data types for these properties to the screenshot for ease of reading. The data types are not displayed as part of the default GUI.

Computed Properties
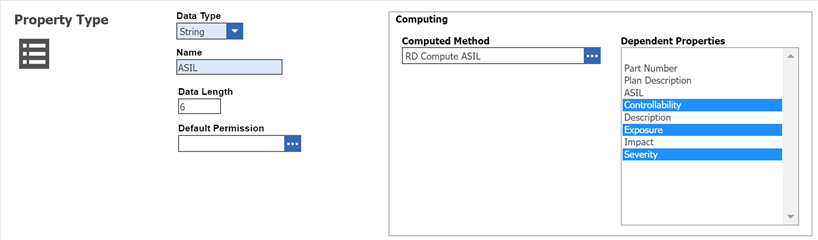
You may find that you want some property values to be calculated based on other properties rather than manually set by your users. For cases like this, you can pass a JavaScript method as a Computed Method. The return value of this JavaScript method can be used to set both the value and style of a property's cell in your document. The structure for this method will look something like below.
For our purposes, we want our ASIL value to be calculated based on our Severity, Controllability, and Exposure.

In addition to setting the Computed Method, we also want to mark that this method is dependent on some other properties.
Element Bindings
One thing we can do with these added Element Types is bind them to specific ItemTypes. This means that when a user adds a new item to our CMF document, they can choose to create or pick an instance of the bound ItemType similar to the functionality available from the standard relationship grid. Note however that while you can reference the bound item and it's properties, there is no direct relationship between the CMF document and the bound item. I consider this a "soft" relationship as it does not follow all of the rules of a normal relationship.
In order to keep the data in the document consistent, items that are "related" to the document can go out of sync. If the document was created when the name of a Part was "Part 1", it will still be "Part 1" in the document even if the name is updated. That being said, synchronizing the data is as easy as running a simple action from the editor.
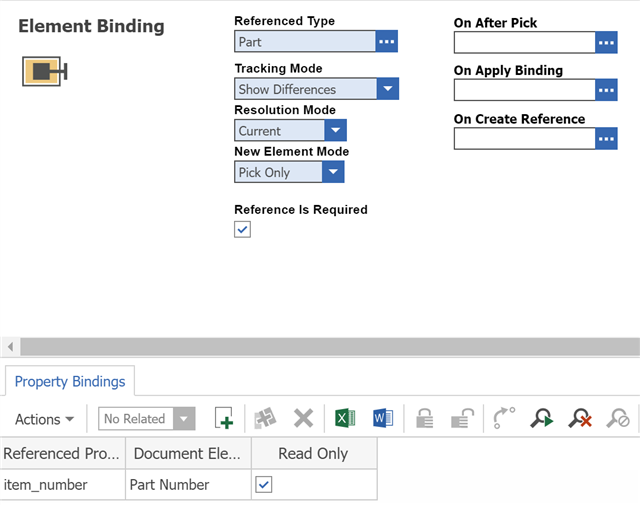
Bind Part at Risk to Part
This CMF document will only require one binding which we can create by right-clicking on our Part at Risk element and selecting Add Element Binding. Once we have the element binding, we'll have to configure some settings for this binding as shown below.
Define the View(s) of the Document
CMF documents allow administrators to define different views for the same hierarchical structure. For this example, our document will only have one view.
Define Columns
We'll want to create 8 columns inside of our view: one for each property that we added to our Element Types. For each of these columns, we'll need to define what kind of editor should be used to set the value of our properties.
- Property Default
- A simple text field that allows users to enter any text they want
- Bound List
- A dropdown that allows users to select a value from a pre-defined list
- Unbound Combo
- A combination of the other two fields. Users can select from a pre-defined list, but they can also choose to enter in a new field. Newly entered values will be added to the list that is available for other users.
We'll want to define our editors like so:
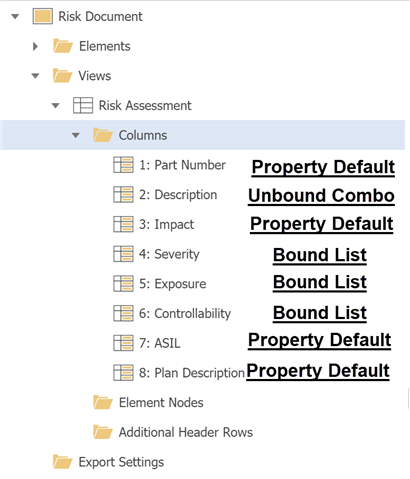
As with the property screenshot earlier in the blog, I've added the editor types to this screenshot to make it easier to read. This is not part of the default GUI of the CMF editor.
Define Element Nodes (Optional)
One quality of life improvement we can make to our document is to add labels and icons to each of our Element Types by adding associated Element Nodes. This will help users more quickly identify elements in the hierarchy when editing the document and creating these is encouraged.
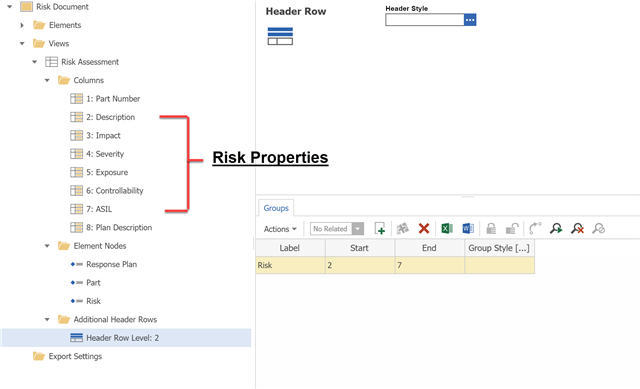
Define Header Rows (Optional)
By default, our editor will have a single header row that lists the Labels of the columns that we defined. However, we can add additional rows to group information and make reading a document easier for our users. Let's group all of the columns associated with our Risk Element Type under a new row labeled Risk.
Create a New Document
Now that we've defined our CMF document, we can see what the experience of creating and editing a document is like.
- Navigate to your CMF ItemType in the TOC
- Create a new item
- Set any property values in the form view
- Save the item
- Click on the CMF Editor button in the sidebar
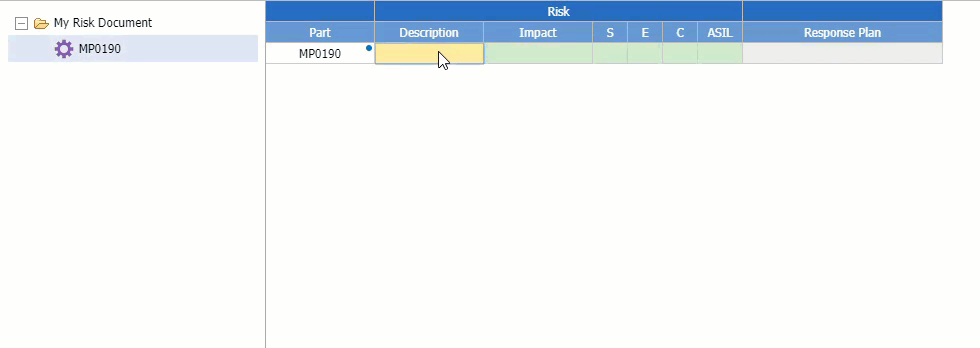
Add a Part
As this is a hierarchical structure, we'll need to create elements for the highest level of our hierarchy before we can create any child elements. In this case Part, is our highest level element. I've configured my CMF document to require users to add only existing Parts in the system which they can do through a right-click context menu.

This will launch a familiar search dialog on the Part ItemType. Once they select a Part a new row will be added to our CMF document.
Add Risk(s)
We can add our Risk either by using the context menu on the Part in the structure on the left of the document or by right-clicking directly in the document itself where we want to add the risk. Either way, we can add one or many Risks associated with this Part. Notice that as we fill out the Severity, Exposure, and Controllability, the ASIL value is automatically updated to reflect the importance of this Risk.
Add Response Plan(s)
Adding a response plan will be identical to adding a risk. Users can simply right-click on the last cell of the document and choose to add a response plan. In the same way that many risks can be added to a single Part, many response plans can be added to a single risk.
Conclusion
The Content Modeling Framework provides a useful set of tools for building reusable documents that you can be sure follow a specific format and still gives you the same level of customization that you have over the rest of the Aras platform. The spreadsheet-like editing will will also feel familiar to users who have experience with Excel, but it gives administrators more control over the final look of the spreadsheet. If you're already using CMF, please share your story and use case in the comments.