


This post will cover the basics of Workflows, an organizational tool of businesses everywhere. We’ll go over creating a Workflow map, adding steps to it, and assigning it to an item. At the end, we’ll talk a little about creating tasks for the Workflow we’ve created. Once you finish, you’ll know how to make Workflows for your own organization, and will be able to customize to your heart’s content.
To follow along, you’ll want to be an Administrator in Aras Innovator. The screenshots in this post were taken on Aras Innovator Version 12 Service Pack 10, and while the steps should be similar if you’re on Version 12 you may notice small differences in what you see if you’re using a different service pack.
Create A Workflow Map
Lets start by creating a new Workflow. This will feel familiar to anyone who has been following our Aras Fundamentals series, as a Workflow is just another item. (Welcome to Aras Innovator, where just about everything is an item if you try hard and believe in yourself!) Follow the steps below:
- Open the table of contents, and look under Administration.
- Click on Workflow Map.
- Click on Create New Workflow Map.
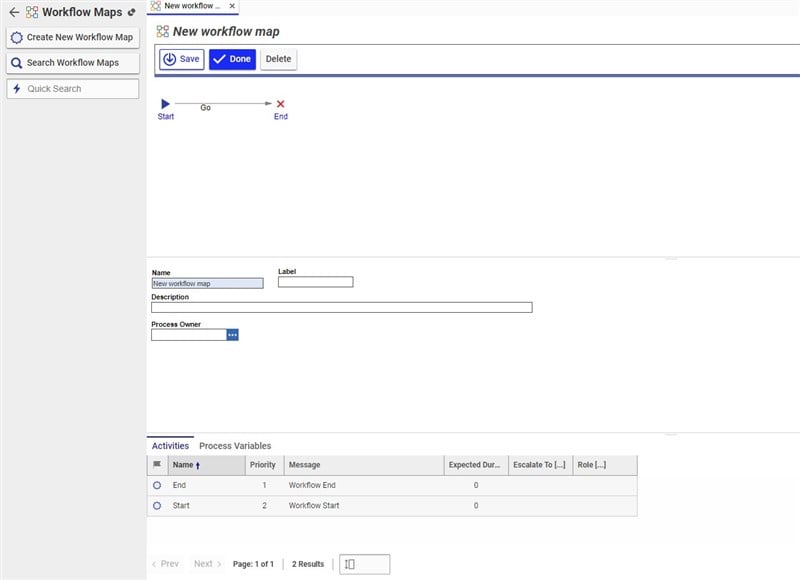
- You’ll see a form open up. It has three main parts- a visualization of your map, some details about your map like Name and Description, and the relationships your Workflow Map has.
- Under “Name” type a name for your Workflow map. We’re going to call it Purchase Order for example.
- Under “Process Owner” you need to select an identity. Here, we’re going to use the Administrator identity.
- Click Save, up above.

Assigning a Map to an ItemType
On its own, a Workflow map isn’t going to be usable. It sits there, disconnected from your processes. To fix that, lets connect it to an ItemType. Here, we assume you’ve followed along with the Fundamentals series and have a Purchase Order ItemType to connect to, but you can use another ItemType in your instance if you prefer.
To assign your new Workflow to an ItemType, follow the steps below:
- Open the table of contents, and look under Administration. Click on ItemTypes.
- Search for the ItemType you want to connect to. We’re going to search for the Purchase Order ItemType, but again, you might be using something different. Open your ItemType.
- Click Edit
 to open the ItemType for editing.
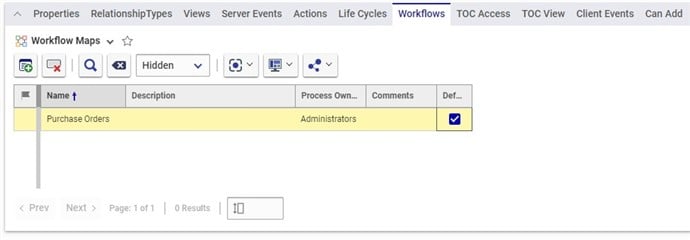
 - The relationship tabs should be at the bottom of the form. Look for the Workflows tab.
- Click the Add Workflow Maps button.
 You’ll be presented with a search grid.
 - Search for your Workflow map by the name you gave it earlier, for example “Purchase Order”
- Select it, then hit OK.

- On the right of the new row, you’ll see a checkbox labeled Default. Check this box to make this the default map for that ItemType.
- Save and close your ItemType!
Activities and Paths
Now we have our foundations laid. The Workflow exists, and is assigned to the ItemType. An item of that type can move through the Workflow map, stopping at the various stages it hits on its journey of improvement and additions. Of course, right now our map has only one step, which is probably not worth making a whole Workflow for. Lets get to the part we’ve been waiting for, adding new activities and paths!
Some definitions: In Aras Innovator, an activity is what generates assignments and tasks. Think of an activity as a place where your Workflow says “someone needs to do something here.” An activity path, on the other hand, connects Workflow activities. If there are multiple possible next steps, the multiple paths are forks in the road, and someone is going to need to decide where to go next. Both are added from the Workflow form, so go open your Workflow back up again.
To add an Activity:
- Make sure the Workflow is open for editing by hitting the edit button if it is shown.
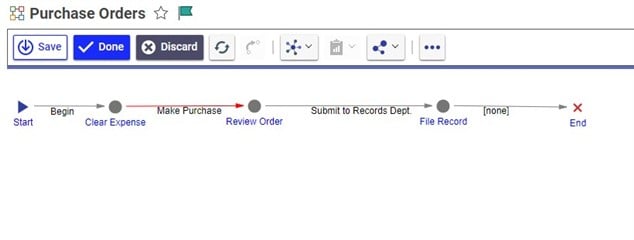
- Right click on blank space on the Workflow canvas- the upper part of the form- and select “Add Activity” from the context menu.
- Enter a name for the activity below. In this example, we’ll call our first activity “Review Order”
- Repeat steps 2 and 3 as many times as needed, for each activity you want to create.
To add an Activity Path:
- Make sure the Workflow is open for editing by hitting the edit button if it is shown.
- Right click on the activity you want to start from, and select “Add Path” from the context menu. You’ll now see a small arrow trailing after your mouse.
- Left click on the activity you want to transition to. The arrow will now snap to that activity node.
- Repeat steps 2 and 3 as many times as needed, for each activity path you want to create.
Keep in mind while working with the Workflow map that you can always left click an Activity or Activity Path to change its name or other details, and that you can freely click and drag activities around the map. Don't try this on a highway map. We got very lost the time we did.
Conclusions and Congratulations
Today you’ve learned the basics of Workflow maps. You’ve made a new Workflow, assigned it to the ItemType it fits with, and added some activities and activity paths. You might have even edited or rearranged the activities and activity paths, making it visually clearer what is going on in your process. There are countless customizations you can make, both to your process and to how it’s represented in Aras Innovator, and hopefully as Aras Innovator becomes more integral into how your organization functions you’ll find ways to improve your process that are only possible with Aras. From methods which fire as an item reaches a new stage of your Workflow to voting weights to get input from key decisionmakers, the Workflow Maps are a powerful tool to making Aras Innovator work for you.