

This article will cover the basics of Life Cycles, which are a tool you can use to control your items in Aras Innovator. Each item advances through various states or milestones as it evolves: specific stages that organizations need to track in order to ensure adherence to an internal policy, an external compliance requirement, or just good team governance. Once you finish reading this article, you’ll know how to edit and make use of Life Cycles for the items in your organization.
To follow along, you’ll want to be logged in as an Administrator in Aras Innovator. The screenshots in this post were taken on Aras Innovator Version 12 Service Pack 10, and while the steps should be similar if you’re on Version 12, you may notice small differences in what you see if you’re using a different service pack.
An Overview of Life Cycles
First, some Life Cycle basics. Every item has a Starting state, though you can rename what that state is labeled. A new item whose ItemType is assigned to that Life Cycle will always be created in that starting state. From there, the Life Cycle is built of other states and transitions to those states. Each transition is shown as a line from one state to another, and is generally labeled with the identity of who can move the item along that transition. Sometimes it’s the person who created the item, sometimes it’s a member of a specific team, and sometimes it’s a specific user.
It is generally better practice to use general identities rather than specific users, so that your organization can continue to function should someone leave for another role- or just take a vacation!
Create a Life Cycle
Lets make a new Life Cycle and then assign it to the Purchase Orders ItemType we created in a previous Aras Fundamentals article. In your own instances, you may find that many ItemTypes have simple default Life Cycles. Feel free to edit those or to replace them with your own creations!
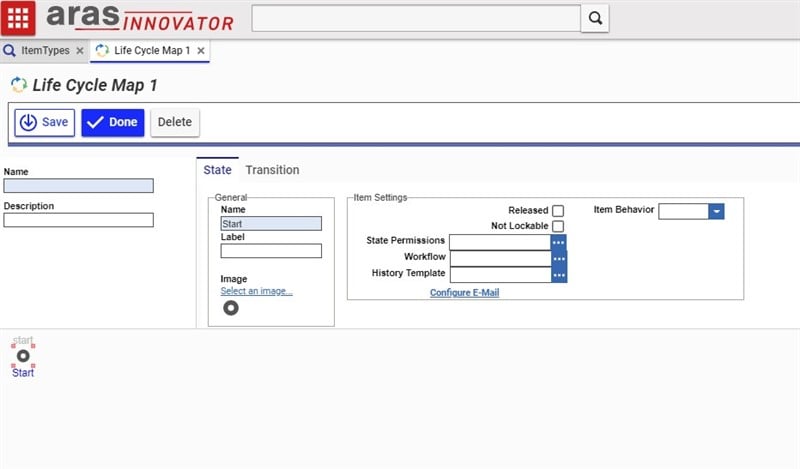
- In the Table of Contents (TOC) navigate to Administration -> Life Cycle Maps and click “Create New.”
- Make sure you give your new Life Cycle Map a name. Here, we’re calling ours “Design Request.”
- Below, you should see a map on which you can add states and transitions. Right click on an empty space to add a state.

- You can edit the name of that state by left clicking on it, then changing the State Name on the form above.
- Remember, you can drag states around by left clicking and holding on a state, then dragging your mouse where you want the state to be.
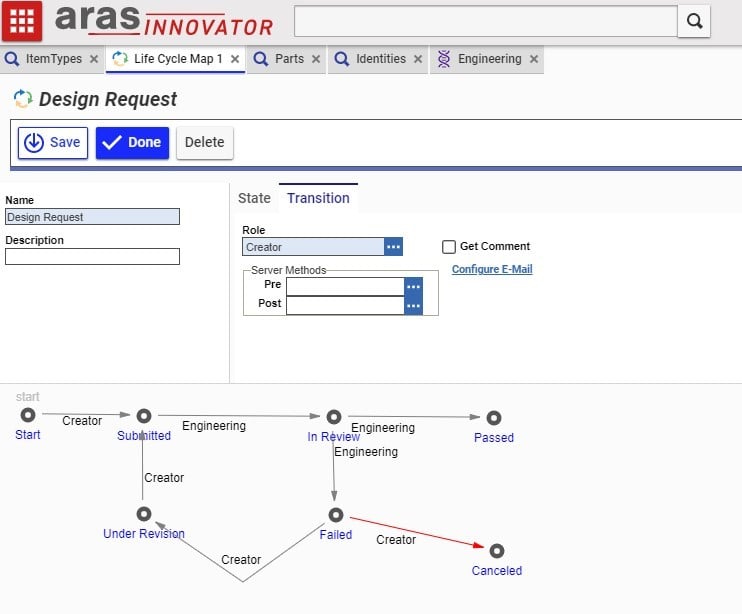
- Once you have a few states, add transitions between those states by right clicking on state and selecting “Add Transition” then left clicking the state you want to connect it to.
- You can change who can use a transition by left clicking on it, then editing the Role field in the form above.
- You can also add bends to a transition line by right clicking it and selecting “Add Break.” This won’t affect the function of the transition, but it can help make things visually cleaner.
- When you’re ready, click Done
 to save your Life Cycle map.
We need to do more than just create the map however: we need to assign it.
Assign a Life Cycle
Now, let’s assign this Life Cycle to our Purchase Orders ItemType. Without that assignment, they won’t follow your new Life Cycle. If you’re following along with another ItemType in your system, you may find that it already has a default Life Cycle Map assigned- many ItemTypes in default configurations already have one.
- From the TOC, open Administration->ItemTypes. Search for the ItemType you want to use and open it by right clicking it and selecting “Open.”
- Click the Edit button above.

- In the relationships tabs below, look for Life Cycles. Left click on that tab.
- Add a Life Cycle Map by clicking Add.
 A search menu will pop up- search for your new map by name, select it by left clicking, then click OK.
- Click Done above to finish and save your work.
Congrats, any new items of that ItemType you make will slot in to this new Life Cycle map you’ve created. Now, how do we use this? It’s quite simple really. At the top of any item’s form should be a small icon, the Promote button.  If you click it, you’ll move your item along its pathway to completion.
Conclusions and Congratulations
Now you know about Life Cycles, and now you understand how to configure them to match how your organization works on the real products and projects that you manage. You don’t have to stop here- in Aras Innovator, you can use Life Cycles to track different versions of an item, and you can promote groups of items together- but now you have the fundamentals. We look forward to hearing about what you do with this tool.